To combine data from different records in your query you need to use the <link-entity> element. This is equivalent to a join in SQL.
Each <link-entity> needs 3 key pieces of information:
- The entity type to link to
- The attribute in the main entity to join from
- The attribute in the new entity to join to
<fetch>
  <entity name="account">
    <attribute name="name" />
    <link-entity name="contact" to="primarycontactid" from="contactid">
      <attribute name="fullname" />
    </link-entity>
  </entity>
</fetch>
The part that always confuses me is the naming of the to and from attributes on the <link-entity> element – in my head they should be other way around, which is one reason why a tool such as SQL 4 CDS or FetchXML Builder is so useful to me.
Link Attributes
Unlike SQL, which can have very flexible join criteria, FetchXML requires exactly one attribute on the source entity to exactly match one attribute on the target entity.
Although joins would normally be done on attributes that form a relationship, this isn’t a requirement. You can join on any attributes that are compatible, e.g. you could use the following to find leads that have the same email address as a contact:
<fetch>
  <entity name="lead">
    <link-entity name="contact" to="emailaddress1" from="emailaddress1">
      <attribute name="fullname" />
    </link-entity>
    <attribute name="fullname" />
  </entity>
</fetch>
For a great example of putting this type of join into practise, take a look at Jonas Rapp’s blog on creating a view to show contacts in the same state as the current user.
Many-to-Many Relationships
If you have a many-to-many (N:N) relationship you can’t join the entities directly, you have to join via the intermediate “intersect” entity. This is a hidden entity type that is created for you automatically and isn’t available for you to view directly in your app or even look at in Advanced Find, but you need to be aware of the details of these when you are building queries that navigate these relationships.
For example, contacts can be part of many marketing lists, and each marketing list can contain many contacts, so this forms a many-to-many relationship. The contact entity itself can’t hold a list of all the marketing lists it’s part of in a field of its own, as there’s no way for it to store a potentially unlimited number of lists. Similarly, the marketing list entity can’t store all its members directly. Instead, a third intersect entity is used to join the two, and a record of this entity type is created for each contact/marketing list pair:

| contactid | fullname |
|---|---|
| 1 | Mark Carrington |
| 2 | Joe Bloggs |
| entityid | listid |
|---|---|
| 1 | 1 |
| 2 | 1 |
| 2 | 2 |
| listid | listname |
|---|---|
| 1 | Latest Contacts |
| 2 | Imaginary Contacts |
With this data we can see there are two contacts and two marketing lists. The first contact is a member of one list, and the second contact is a member of both.
Querying this relationship to find a list of all contacts that are part of a marketing list, and the names of the lists they are part of, would look like:
<fetch>
  <entity name="contact">
    <link-entity name="listmember" to="contactid" from="entityid">
      <link-entity name="list" to="listid" from="listid">
        <attribute name="listname" />
      </link-entity>
    </link-entity>
    <attribute name="fullname" />
  </entity>
</fetch>
Finding the intersect details
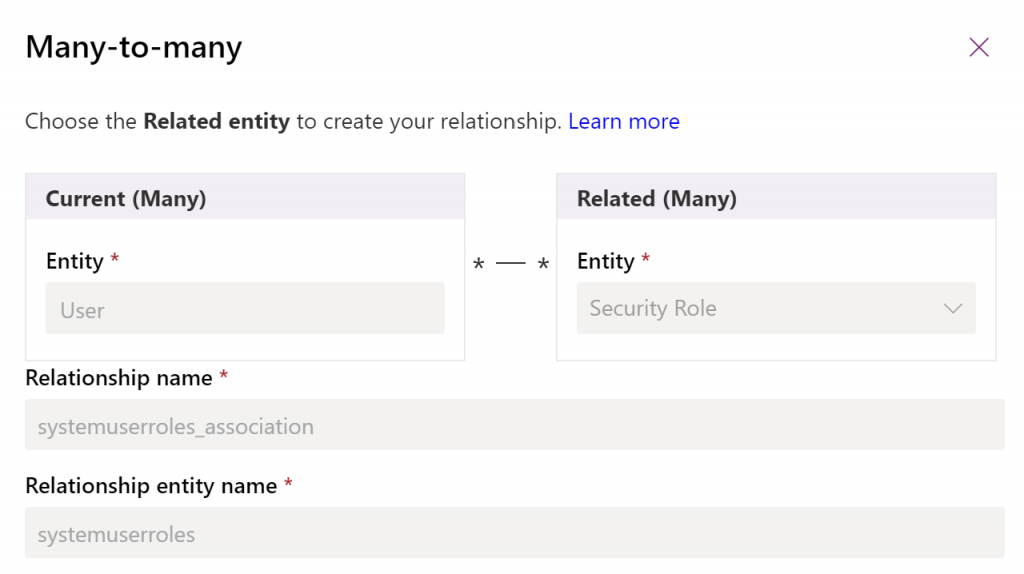
To build this query you need to know the names of the intersect entity and the attributes in it to join on. You can find the intersect entity name from the relationship properties in the customisation screens, for example here in the Maker Portal:

The intersect entity is shown here in the “Relationship entity name” field. Unfortunately it doesn’t show the foreign key fields on this entity that link to the two main entities. To find those names you’ll need to use a tool such as SQL 4 CDS or Metadata Explorer.
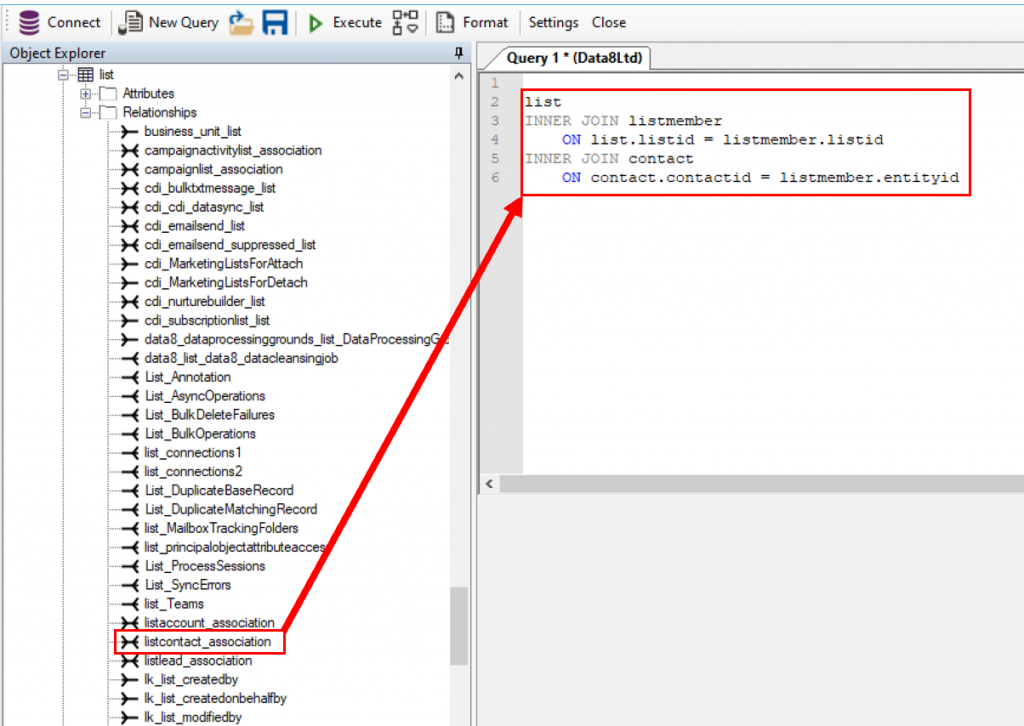
With SQL 4 CDS, you can use the Object Explorer pane to help add the correct syntax for a join. Double-click on a relationship to add the join into your query. If you select an N:N relationship the join will include all three required entities. For example, the contact to marketing list relationship includes the listmember entity:

Link Types
FetchXML supports two link types – inner and outer.
An inner join will include only records where there is a match across both entities. By comparison, outer join will include all the records from the first entity even if there is no match in the second entity.
We can modify the first query to include all accounts even when they don’t have a primary contact by adding the link-type="outer" attribute:
<fetch>
  <entity name="account">
    <attribute name="name" />
    <link-entity name="contact" to="primarycontactid" from="contactid" link-type="outer">
      <attribute name="fullname" />
    </link-entity>
  </entity>
</fetch>
Link Aliases
When a query with a <link-entity> is executed, the attributes retrieved from the link are given a prefix of the entity name, e.g.:
| name | contact.fullname |
|---|---|
| Data8 Ltd | Mark Carrington |
As I showed in the post on the <attribute> element, this prefix can be removed by giving the attribute itself an alias.
Another option is to give the <link-entity> an alias, which changes the prefix, e.g.:
<fetch>
  <entity name="account">
    <attribute name="name" />
    <link-entity name="contact" to="primarycontactid" from="contactid" alias="person">
      <attribute name="fullname" />
    </link-entity>
  </entity>
</fetch>
| name | person.fullname |
|---|---|
| Data8 Ltd | Mark Carrington |
Limits
Each query can contain a maximum of 10 links. Hopefully this should be enough for most queries. There is no way (that I know of) to increase this limit, so if you do need more you’ll need to execute multiple separate queries and join the results in your own code.
Because the links are ultimately converted to SQL joins, having more joins than this would likely result in some inefficient queries as the database engine would start hitting query optimizer timeouts, so this seems like a reasonable limit.
SQL Equivalents
The inner and outer link types are equivalent to the INNER JOIN and LEFT OUTER JOIN join types in SQL.
The from and to attributes in the link are equivalent to the ON clause of the join, and the alias attribute is equivalent to the AS table alias clause.
However, the FetchXML syntax is more restrictive than SQL as you can only use a single exact field match for the join criteria, rather than the complex criteria that you can use in a SQL ON clause (although it is possible to extend this a little further using a <filter> element which I’ll look at next time). Aliases can also only be applied to a <link-entity> and not the root <entity>.
In SQL 4 CDS, the first entity you reference in the FROM clause will be used as the main <entity> and any following joins will become <link-entity> elements. Although you can apply table aliases at any point, they will only be reflected in the generated FetchXML in the <link-entity> elements, e.g.:
SELECT a.name,
       c.fullname
FROM   account AS a
       LEFT OUTER JOIN
       contact AS c
       ON a.primarycontactid = c.contactid;
is translated to:
<fetch xmlns:generator="MarkMpn.SQL4CDS">
  <entity name="account">
    <link-entity name="contact" to="primarycontactid" from="contactid" alias="c" link-type="outer">
      <attribute name="fullname" />
    </link-entity>
    <attribute name="name" />
  </entity>
</fetch>
Next time I’ll take a look at the <filter> element and particularly see how that can be combined with <link-entity>.
One thought on “Inside FetchXML pt 2 – link-entity”